参考:
腾讯云248上海 安装PVE 7.1-5 成功 , NAT小鸡批量端口转发也搞定-美国VPS综合讨论-全球主机交流论坛 - Powered by Discuz! (hostloc.com)
[价值5000元套娃技术:PVE套娃NAT小鸡可以安装Docker再次套娃-MOE社区](https://bbs.moe.ms/37016.html)


[Debian 10安装Proxmox VE,并利用单IP VPS LXC虚拟化开NAT小鸡 - 80后'Blog (idcfq.com)](https://www.idcfq.com/544.html)


[独立服务器proxmox单IP桥接 自动获取IP配置](https://www.notion.so/proxmox-IP-IP-8283ca9f9c3b4e018279962e8c5cf09a)
目前在dabian11中(dabian9失败,因为源的问题.10未测)
一、先DD一个纯净dabian11系统:
DD方式一:萌咖
apt-get update
apt-get install -y xz-utils openssl gawk file wget
wget --no-check-certificate -qO InstallNET.sh '<https://moeclub.org/attachment/LinuxShell/InstallNET.sh>' && chmod a+x InstallNET.sh
国内使用下面镜像
bash InstallNET.sh -d 11 -v 64 -a --mirror '<http://mirrors.aliyun.com/debian/>'
国外使用下面语句
bash InstallNET.sh -d 11 -v 64 -a
DD方式二:自动切换国内外dd源
来自:Linux 一键dd脚本更新,增加RockyLinux 8和AlmaLinux 8的支持 | VPS收割者 (idcoffer.com)
wget -N --no-check-certificate <https://down.vpsaff.net/linux/dd/network-reinstall-os.sh> && \\
chmod +x network-reinstall-os.sh && ./network-reinstall-os.sh
二、修改hosts和hostsname
hostnamectl set-hostname pve
修改hosts
/etc/hosts,添加如下内容
127.0.0.1            localhost
188.188.188.188          pve.proxmox.com pve
#pve等于hostsname
#这里填母鸡公网IP
#The following lines are desirable for IPv6 capable hosts
::1     localhost ip6-localhost ip6-loopback
ff02::1 ip6-allnodes
ff02::2 ip6-allrouters
验证下,看返回的是不是公网ip
hostname --ip-address
三、准备安装proxmox
1.dibian11:
国内源
echo "deb [arch=amd64] <https://mirrors.tuna.tsinghua.edu.cn/proxmox/debian> bullseye pve-no-subscription" \\  > /etc/apt/sources.list.d/pve-install-repo.list
国外源
echo "deb [arch=amd64] <http://download.proxmox.com/debian/pve> bullseye pve-no-subscription" \\  > /etc/apt/sources.list.d/pve-install-repo.list
dabian10改为:
国内源
echo "deb <https://mirrors.tuna.tsinghua.edu.cn/proxmox/debian> buster pve-no-subscription  " \\  > /etc/apt/sources.list.d/pve-install-repo.list
国外源
echo "deb <http://download.proxmox.com/debian/pve> buster pve-no-subscription" > /etc/apt/sources.list.d/pve-install-repo.list
2.以 root 身份添加 Proxmox VE 存储库密钥(或使用 sudo)(dabian11可以用最新公钥,10只能用6.x)
debian11:
wget <https://enterprise.proxmox.com/debian/proxmox-release-bullseye.gpg> \\ -O /etc/apt/trusted.gpg.d/proxmox-release-bullseye.gpg
dabian10改为:
wget <http://download.proxmox.com/debian/proxmox-ve-release-6.x.gpg//download.proxmox.com/debian/proxmox-ve-release-6.x>.
chmod +r /etc/apt/trusted.gpg.d/proxmox-ve-release-6.x.gpg
3.国内机器修改清华的pve源(国外忽略)
nano /etc/apt/sources.list.d/pve-no-subscription.list


修改里面的地址为


[https://mirrors.tuna.tsinghua.edu.cn/proxmox/debian](https://mirrors.tuna.tsinghua.edu.cn/proxmox/debian) bullseye pve-no-subscription


CT Templates


将 /usr/share/perl5/PVE/APLInfo.pm 文件中默认的源地址 [http://download.proxmox.com](http://download.proxmox.com/) 替换为 [https://mirrors.tuna.tsinghua.edu.cn/proxmox](https://mirrors.tuna.tsinghua.edu.cn/proxmox)


一键修改


cp /usr/share/perl5/PVE/APLInfo.pm /usr/share/perl5/PVE/APLInfo.pm_back


sed -i 's|[http://download.proxmox.com](http://download.proxmox.com/)|https://mirrors.tuna.tsinghua.edu.cn/proxmox|g' /usr/share/perl5/PVE/APLInfo.pm


最后reboot重启即可
实际测试:只需要修改/etc/apt/sources.list.d/pve-install-repo.list为
deb [arch=amd64] https://mirrors.tuna.tsinghua.edu.cn/proxmox/debian bullseye pve-no-subscription
/usr/share/perl5/PVE/APLInfo.pm文件不存在,也无需重启
4.通过运行更新您的存储库和系统:
apt update && apt full-upgrade
有Y按Y
5.安装 Proxmox VE 软件包
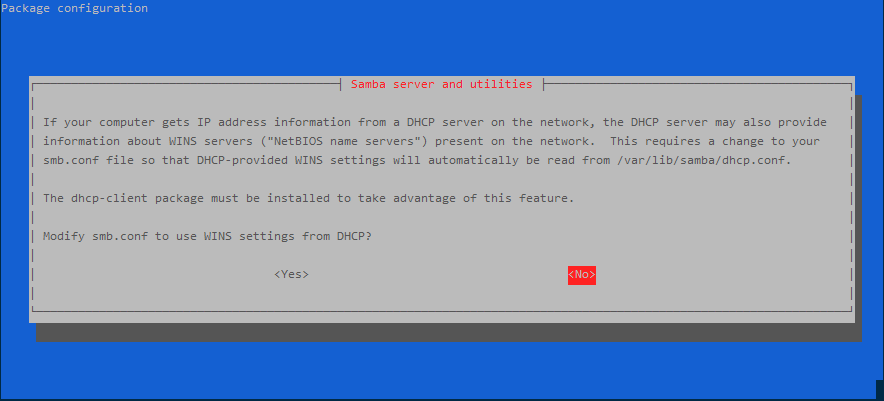
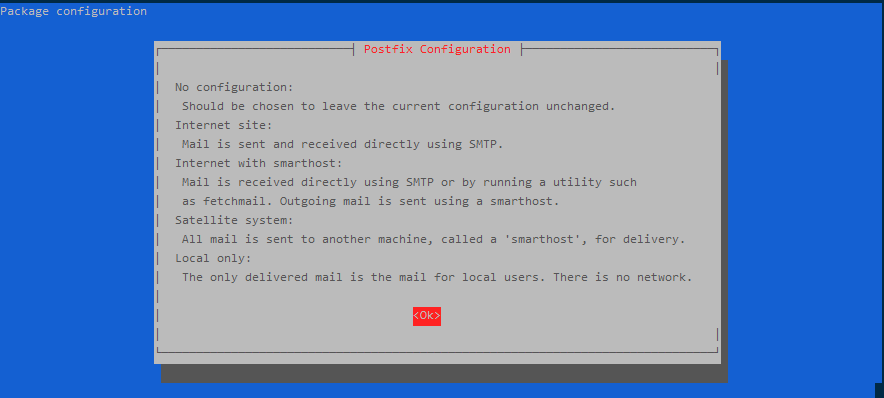
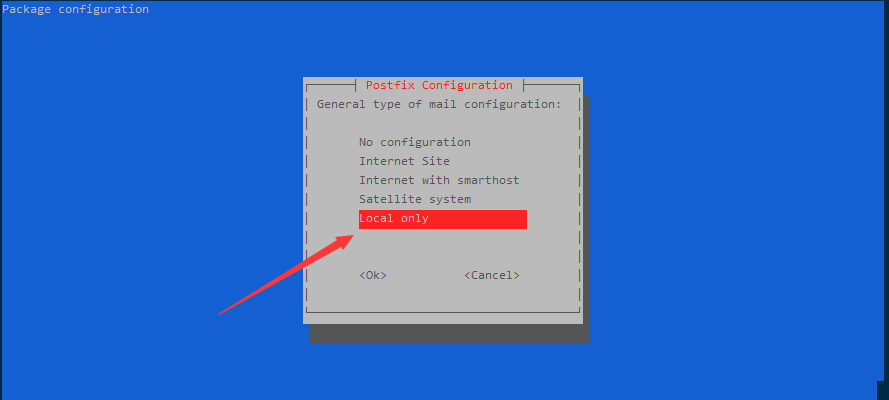
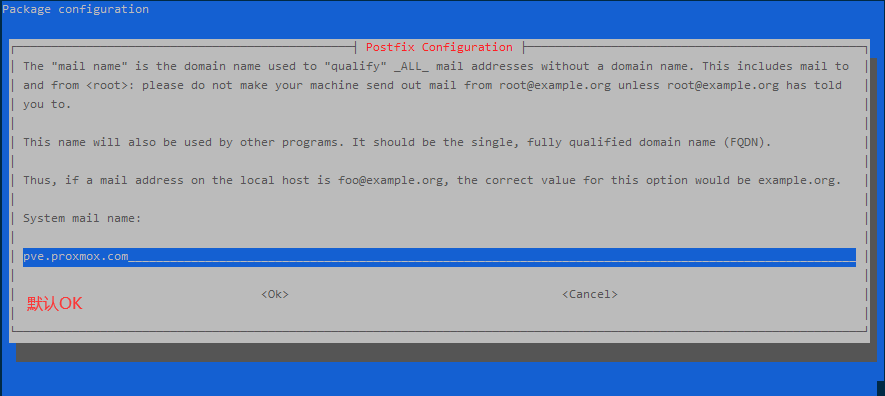
apt install proxmox-ve postfix open-iscsi


在主机名修改为pve 那域名也必须要设置为pve.proxmox.com,就相当于主机名.proxmox.xom

四、注意事项:
1.期间国内独服经历过无数次
The following packages have unmet dependencies:
proxmox-ve : Depends: pve-manager but it is not going to be installed
Depends: pve-qemu-kvm but it is not going to be installed
Depends: qemu-server but it is not going to be installed
Depends: spiceterm but it is not going to be installed
Depends: vncterm but it is not going to be installed
E: Unable to correct problems, you have held broken packages.
的错误,其实均为源的问题引起的
2.安装完后要注意配置网卡,否则重启后无网,有VNC或ipmi还能抢救下
3.安装完记得注解掉PVE企业源,添加社区版源不然提示更新错误,除非你买授权.
vi /etc/apt/sources.list.d/pve-enterprise.list
#deb <https://enterprise.proxmox.com/debian/pve> stretch pve-enterprise
#deb <https://enterprise.proxmox.com/debian/pve> buster pve-enterprise
deb <http://download.proxmox.com/debian/pve> stretch pve-no-subscription
deb <http://download.proxmox.com/debian/pve> buster pve-no-subscription
独立服务器proxmox单IP桥接 自动获取IP配置
欢迎指出任何有错误或不够清晰的表达,可以在下面评论区评论。

